Showing posts with label Scallop punches. Show all posts

Saturday, June 9, 2012

Funky Flock Card...

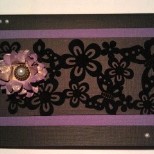
This birthday card was created using a black and purple textured cardstock . The flower frenzy flock ( say that when you're drunk!), is a self adhesive flock from Kaszazz. I created the flower using the scallop punch - several layers, spritz with smooch spritz grape and then do some creative crunching!

I needed to create a gift card holder, so made a die cut scallop strip, tied some ribbon around and then could slot my card in. I then used the scallop die at the bottom of the inside piece to tie it all together. The scallop die is from Kaszazz and I used the ezy-press to create it.

Now, I had the age old dilemma of , what to put a 3D card into! Well, I used the envelope template from the ezy- press and loosely folded it over and secured it with a tied bow. I made another flower- I know I must really love the person I made if for , right? Yeah, she is rather spesh. I wanted to make it so the bow was easy to open, so I stuck the flower onto a small clip and slotted it over the middle of the bow!
Anyway, hope your weekend it great, we have a long one- The Queens' Birthday weekend.
Happy Birthday Elizabeth.
Take care
Deb

Tuesday, November 16, 2010

Swirls and Rose Layout

I created this page for a Make and take I did recently. I'm sure I went over budget, but if you just do the ivory square card, then you shouldn't! The ink for the swirls was creamy brown chalk ink. The rose was done in much the same fashion as my previous post, where you punch out 3 scallop large shapes, ink around them using orchid pastel chalk ink and an IBT (ink blending tool). Fold the bottom scallop down to form a platform, keep the next one straight as a base and then roll the edges of the next one so that the paper splits and can be curled up. Punch a medium and small scallop for the inner flower and top it off with a sticky pearl. The beautiful lacey border was made using our Ezy-press die and then distressed lightly using vintage photo distress ink. I edged a piece of oatmeal 12 x 12 card using creamy brown chalk ink and stamped the dainty flourish on some edges, as you can see.
A simple page, but quite cute, even if I may say so myself!! Give it a try and remember, if you don't have all the same stuff, use the design and improvise with what you do have- that's what creativity is all about.
Have a creative week.
Deb

Monday, November 8, 2010

Paper Roses and Lace Layout


This was my challenge for the retreat. I got the Lily May paper,Summer sandie,  SB essentials Blush and SB essentials bling, opal. I added petunia bazzill and Jasmine lee papers as well as pearls for the centre of the flowers. This is just too fussy to run as a workshop though, as there were too many steps. You could run just the first page and give them the idea for the second. In this layout you needed to use the Ezy-Press for the lace parts , as well as the leaves. I used the Summer sandie paper for the tree and fashioned it with strips. I used vintage photo distress ink to darken it and make it more tree like. The roses were made by punching out 2 scallops from the opal bling, rolling the ends to distress the paper so you can split it into 2 and then use the IBT and orchid pastel chalk ink to colour and then use vintage photo to give a 'ye olde rose' look. The smaller roses were done in the same way just using the smaller punch and adding leaves. Some pink organdy ribbon was also used.
Anyway, I hope this inspires you to create !!
                                       Take care
                                            Deb